Installation Notes

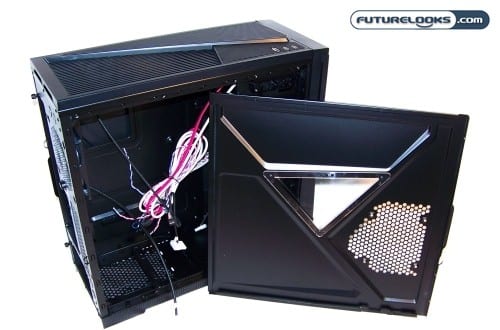
The CPU motherboard tray cut out made removing CPU coolers much easier. Nothing saves you more time than not having to remove the motherboard just to change coolers. Users will also appreciate that the inside is pretty well machined so that you won’t lose any blood during installation.
We always like to check any case’s special functions including any tooless features to make sure they work. While installation was pretty simple, the PSU tray was rather snug due to the placement of a metal tab. However, you can bend it upwards if you need a little extra room. Also, there were two chassis standoffs that level off the PSU to make securing the screws easier. These little standoffs can scratch your elite PSU’s finish if you’re not careful.
Thermal Performance Results
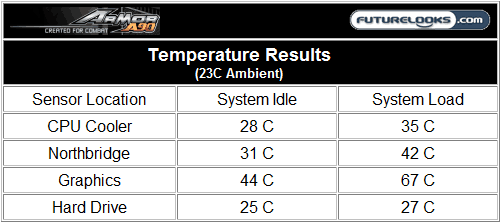
The Zalman ZM-MFC2 fan controller was used to monitor temperatures. It can monitor up to four different temperature probes at once. Probes were placed near the CPU, video card, hard drive, and north bridge chipset. These will help monitor internal chassis temps. Then, the system was set up to run Furmark and OCCT to really heat up the system without the case fans on for 5 minutes.

With a starting ambient temperature of 23C and an internal case temp of 45C, the fans were turned on. At this point, the case took less than a minute to clear out the unusually hot air. That’s because the fans are able to move a good amount of air in respect to the internal volume of the chassis. We then ran Furmark and OCCT for another half hour to continue to our load temperatures. Temperatures at both load and idle were more than acceptable.
Something worth considering is the addition of the optional side panel 120mm fan. Whether a Thermaltake unit or one of your own, it will manage temperatures even better throughout the case. A single quick test of our own showed a quicker overall drop in temps especially in the area of the CPU.
Noise Level Results

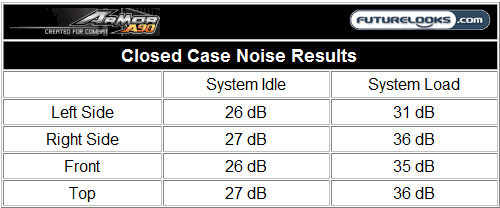
Any fan noise during testing was quite low. Even though the fans are rated to 16dB, we actually recorded them at 18dB at their highest point up close. The top 120mm fan is the most noticeable because it’s partially covered which tends to generate a little more vibration and air noise. However, the overall noise was about 15dB with the case all closed up. In fact, it was quite livable even sitting right next to it.
Final Thoughts

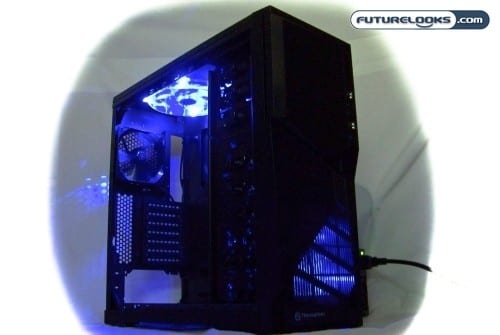
The Armor A90 is a tribute to the hardcore gamer with the elite battle sense to push forward when others quit. A champion requires maximum performance from their system at all times. And, even as temperatures rise both in battle and within your enclosure, the Armor A90 will help keep the heat and your opponent at bay.
Considering all that we’ve seen in and outside the Thermaltake Armor A90 gaming chassis, it’s a new case that offers all of the major features the standard gamer could want or need to get the job done. We would like to have seen a side panel fan in the bundle to give it great cooling performance even though it isn’t really needed. We would, however, recommend it to users living in very warm areas or if your system uses a particularly hot GPU that’s barely stable even in regular temperatures.
At a moderate $89.99US from Newegg, this places the armor plated inspiration among many other similarly priced budget gamer cases. There are some rebates floating around, but those do eventually end. Even at this price, it’s the unique case design that will call to consumers and especially gamers like a beautiful succubus. You know you want to look!
Pros
- Unique, armor plated design
- Good, yet very quiet cooling performance
- Blacked out interior
- Tooless drive bay and SSD mount
- Abstract window panel is unique
- Good quality construction overall
Cons
- PSU frame needs some bumpers to prevent scratches
Overall Rating: 8.5/10.0

Love This Review? Hate This Review? Leave a Comment or Hit The Forums!
