Like it Was Born to Rock in Your Media Center

Connectivity options on the Silent Cell HD 4850 are quite good. You get the full gamut from DVI to VGA to HDMI. The HDMI does support HDMI audio output and HDCP. GIGABYTE also gives you caps to cover off all the connections that you don’t use so that they stay dust free and don’t get damaged when not in use.
Having seen all these connections, you will remember that I questions why GIGABYTE put a Composite to S-Video connector in the box instead of a component video out connection. Well, I’m still left wondering because there’s no where to plug it in or utilize it. Seriously, it’s like one of those spare parts left over from assembling IKEA furniture. The only other connection onboard is of course the 6 pin PCI-E power connector, which sits at the back of the card.
Test System Setup
Like with all our video card reviews, we have to assemble a system to push it. Here’s the system we assembled with the following components:
- GIGABYTE GA-MA790FXT-UD5P AM3 790FX Motherboard
- AMD X2 550 Black Edition 3.1GHz AM3 CPU with Stock Cooler
- Kingston HyperX 4GB KHX1600C9D3K2 Memory Kit
- Kingston SSDNow M-Series 80GB Solid State SATA Drive
- LG GSA-H62N Super Multi SATA DVD Rewriter
- Cooler Master Real Power 1250Watt ATX Power Supply
- High Speed PC Top Deck Tech Station
All of this was assembled onto our Tech Station and Windows Vista 64 Bit was installed. All the latest drivers were used as of our testing which included ATI Catalyst Driver version 9.6. Our testing environment was kept at 26C to hopefully allow us to figure out if any of the claims on the box are wildly outlandish, or true. Using an open test bench also allowed us to make sure that the enclosure was not affecting our temperature readings.
Installation Notes
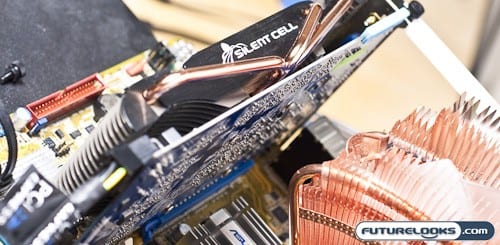
The GIGABYTE Silent Cell HD 4850 installs pretty much like any other video card on the market. In fact, compared to some other passively cooled video card variations on the market, it can be somewhat easier. The reason for this is because the silent cell cooling solution takes up the same foot print as any standard dual slot video card.

Some video cards (even GIGABYTE’s original Multi-Cell passively cooled design) had pieces that extended above the regular confines of a standard dual slot video card. Sometimes the cooling solution makes the card taller, or extends over the backside, creating some collisions other motherboard components. The Silent Cell HD 4850 had none of these issues as you can see in the picture above, even on a fairly cramped MicroATX motherboard that we had kicking around with the fairly wide Thermaltake V1 CPU Cooler attached to it.
The only thing that you may need to keep an eye on is the fact that this card relies on natural convection to enhance its cooling performance. GIGABYTE recommends a tower case, allowing the hot air to flow from bottom to top. This also means that you’ll need to really clean up the inside of the case to maintain airflow. Otherwise, you’ll get hot pockets of air and not the ones you pop in the microwave for 3 minutes.
If you are using an HTPC case, you may need to ensure that there is adequate ventilation above the video card as well. If your case doesn’t have holes above the GPU slot, then there really is no place for the air to go. You’ll cook your card and everything around it.
Benchmark Performance
Benchmarking this card will be like kicking a dead horse. There’s nothing spec wise that makes it better than a reference HD 4850 except for a slight bump in the GPU reference clock. Benchmarks for this card are a dime a dozen by now and even GIGABYTE themselves told me not to bother because this isn’t what makes the card special. With that in mind, I did run a couple of quick checks for those of you that were curious about it’s baseline performance.
For starters the GPU put out a score of 3173 in 3DMark Vantage and a 3DMark06 score of 10856 under stock clock speeds, which on this card, is 640MHz core and 960MHz memory. If you compare this quickly to my original GIGABYTE HD 4850 review, you’ll see that any performance increases are simply attributable to the slightly more powerful system I’m using, newer drivers, and to a certain extent, the extra 15Mhz of core speed.
Overclocked Benchmark Performance
For curiosity sake, I also overclocked the card using the ATI Overclocking utility built into the Catalyst drivers. This also gave me a chance to see if GIGABYTE’s claims of an extra 10-30% of headroom was even remotely doable. Wit that in mind, I invoked the auto tune and found myself going from 640MHz to 705Mhz on the core. This gives me an increase of 10% over it’s stock speed and 12% over the ATI reference of 625MHz. OK, so it’s true, but that 30% has to be in a refrigerator or something. Seriously.
Memory, as I suspected, only hit a measly 965MHz from the stock 960MHz. To be fair, GIGABYTE made no claims about memory overclocking performance. Personally, without some cooling, I wouldn’t go further anyway. The question remains, how much of a gain in performance does this net? Well, 3DMark Vantage GPU score jumped from 3173 to 3428. 3DMark 06 scores jumped from 10856 to 11386. So on this passively cooled card that you just overclocked, you gained maybe a couple frames per second in some games.
Well, we’re going to see what the cost of overclocking is on the next page when we see just what kind of effect this had on the temperature and whether this thermal solution really can improve on the reference fan solution.
