A Quick Look At The BIOS
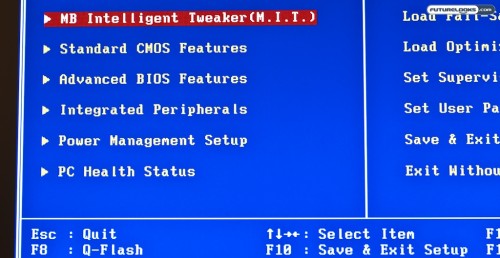
The GIGABYTE BIOS is logically laid out and very easy to use. Overclocking functions are all concentrated in a single menu item at the top of the list, while everything else is taken care of in a more standard and familiar fashion. Q-Flash is also accessible from this screen and allow easy BIOS upgrades without a floppy. Just plug in a USB flash drive with the file and go.
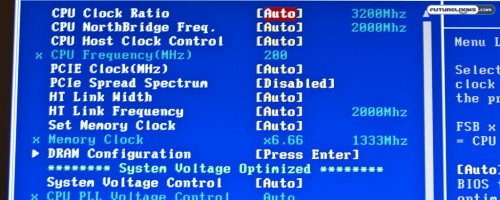
Although not as elaborate as efforts from other companies, everything is there to get your overclocking on. With GIGABYTE’s Precision OV offering providing easy fine tuning and control of every voltage control related to memory, CPU and Northbridge. Comparatively speaking, GIGABYTE’s BIOS is definitely more manual than some of the automatic options provided by other vendors. That’s not such a bad thing just as driving a stick shift is much more fun than driving an automatic.
Installation Notes
For the most part, if you have at least a bit of experience under your belt, you’ll be able to install this board properly with everything that’s included in the box. However, there are a few things worth knowing.
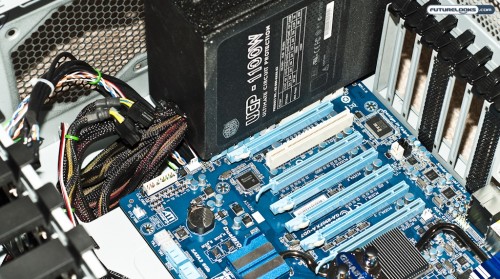
As mentioned, the XL-ATX form factor provided us with some interesting installation considerations. First off, it refused to mount the right way on our HighSpeedPC Top Deck Tech Station. The board was so wide that it refused to sit between the two posts so I had to flip it around backwards. Curious, I decided to test mount it inside a HAF 932 enclosure. As you can see above, it definitely won’t fit unless you flip the power supply to the alternate mounting position which is at the top top of the case. The board sits so low in the case that it is obscured by the PSU when mounted at the bottom.
If you have a mid-sized chassis in mind for a build, this board will definitely not work for you. If you have to be 100% sure about compatibility, you may want to keep an eye on GIGABYTE’s XL-ATX compatibility list.
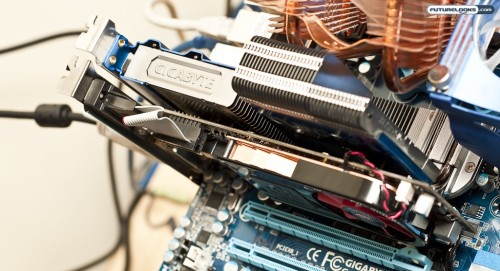
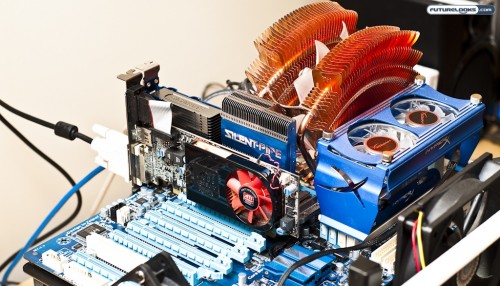
The other thing that you might want to keep an eye on is how you mount the Hybrid Silent-Pipe2 cooler for the northbridge. The picture above shows just how closely the video card sits in proximity to the cooler. You can also see our Thermaltake V1 CPU cooler slightly grazing the back of the Hybrid Silent-Pipe2.
Test System Setup
Our test setup was identical to the system setup in our review of the AMD Phenom II X6 1090T review. To make things interesting, we pitted GIGABYTE’s 890FX board against its 890GX counterpart, the GA-890GPA-UD3H. This will help us figure out if the the step up from the GX to the FX is really worth it.
- CPU(s): AMD Phenom II X6 “Thuban” 1090T 3.2GHz Black Edition
- Motherboard One: GIGABYTE GA-890FXA-UD7 (F1 BIOS)
- Motherboard Two: GIGABYTE GA-890GPD-UD3H (F6 BIOS)
- Memory: Kingston HyperX DDR3 1333 MHz 8GB Quad Channel Memory Kit
- Video Card: ATI Radeon HD 5570 1GB (Catalyst 10.3 Driver)
- Hard Drive: INTEL X25 80GB SATA2 SSD
- CPU Cooler: Thermaltake V1 CPU Cooler
- Power Supply: Ultra Products X4 750 Watt Modular ATX Power Supply
- Optical Drive: LG SATA DVD Writer
- Operating System: Windows 7 Ultimate 64 Bit
- Other: Two CoolerMaster 120mm Case Fans
All latest driver updates as of this writing were used including latest BIOS available for both motherboards. We also disabled the integrated graphics on the 890GX board and used the same video card to make it more of a fair fight. Our hypothesis will be with the integrated graphics disabled, we should see similar results between the two boards. We definitely expect the 890FX to do better in overclocking.
Next we’ll run you through all those graphs with the pretty numbers. Finally, we’ll go over some of the unique features of the board in a bit more detail including the overclocking potential of this flagship chipset from AMD.
