Inside the Antec P183
Since liquid cooling is simpler to work with than ever, the P183 continues to offer two grommet holes so you can customize to your heart’s content. They are located in the most optimal location so that the hoses don’t block your swank water block viewing.
After removing the case paneling, you can really see how the P183 divides the heat. The lower bay has the PSU to help pull cooler air in and expel it out the back. In the case of the CP-850 PSU, it has an externally mounted 120mm fan that does a really good job. However, I recommend you install a front lower 120mm fan like we did so that air moves just a little more efficiently. Just slide out the bottom hard drive bay, mount the fan, run your wire, and slide the drive back. The upper chamber is designed to do just the same.
While the back and top 120mm fans are more than capable of drawing in a great deal of cooler air, it has to pass through the top removable hard drive bay. Acting on the same initiative, I added another front 120mm cooling fan because the case can support it.
The back of the motherboard tray (left side) offers extra space for packing and running wires such as those from the power supply. It helps tidy up your system helping the case really keep your components as cool as possible by not restricting air flow. And if nothing else, we really love a sharp looking, cable managed system.
While the motherboard tray doesn’t offer a CPU cut out for making CPU cooler installations easy ala Cooler Master HAF932, it isn’t the end of the world. Gamer cases with side windows tend to go through more modifications and upgrades and cases in Antec’s line up like the Nine Hundred Two do come with this special cut out. Think of the P183 as a “permanent residence” of sorts for your system.
We do have it on good authority though that the engineers at Antec have heard your comments and considering making that feature an Antec standard. All we can say is, the larger the opening, the better.
Test System Setup
Here is the break down of the test system used to test and measure the CP-850’s performance:
- Intel Core i7 870 “Lynnfield” LGA1156 Processor
- GIGABYTE GA-P55-UD6 and P55A-UD6
- Kingston 2x2GB HyperX 2133MHz DDR3 Dual Channel
- Kingston SSDNow Plus 64GB Solid State Drive
- Western Digital 2TB Caviar Black SATAII
- Dual Zotac Geforce GTX295 SLI (Oh yeah!)
- Koolance Exos 2.5 Liquid Cooling System
- CPU Cooling: Koolance CPU-350AT CPU Block
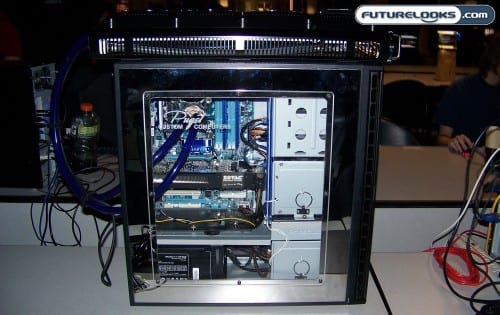
- Customized Antec P183 Enclosure (By Puget Systems)
As you can see in my system specs, my particular build is not the customary system usually found inside a P183 enclosure. This system is a frame rate eating, game destroyer designed to chew up every video game and spit it out! It’s also a very, very power hungry system that will push the CP-850 to its maximum load.
Installation Notes and Comments
Thanks to my friends at Puget Systems, they showed us just how neatly a fully configured system can look when packed in both stock and modified Antec P183 Enclosures. While the stock P183 doesn’t offer a window, Puget Systems utilizes the latest “water jet” machining to cut through the side panel. The end result is a very popular enclosure choice for their systems.

Naturally, the CP-850 Power Supply fits nicely in the bottom section. The screw holes were perfect which is always appreciated. Despite its large and extended size, it just about seals off the lower section creating a great wind tunnel of sorts. You’ll be happy to know that all of the cabling is plenty long and worked perfectly for routing through the P183.
Hard drive mounting is a synch and really does cut down on vibrations created by some of my aging 500GB back-up drives. The drive cages contain rubber grommets that help remove the bulk of any vibrations. My main 2TB Western Digital Caviar Black SATAII Hard Drive really further complimented the system since it’s a very, very quiet hard drive compared to others on the market. SSDs may give you a little more headache if they don’t come with retail mounting adapters like the Kingston SSD that we used.
